How to Properly Prepare Your Files for the Cutting Studio
Releasing a vinyl album: a crucial step for many bands
Nowadays, releasing an album on vinyl has almost become essential for many artists. However, it's not as simple as transferring your digital files directly onto a vinyl record. Technically, digital music is a sequence of 1s and 0s, uniform in its structure. Vinyl, on the other hand, is a unique medium with its own constraints and characteristics. Mastering for vinyl involves preparing the audio to avoid potential issues while maximizing the qualities of this analog format: delivering a warm, natural, and realistic sound .
The Basics
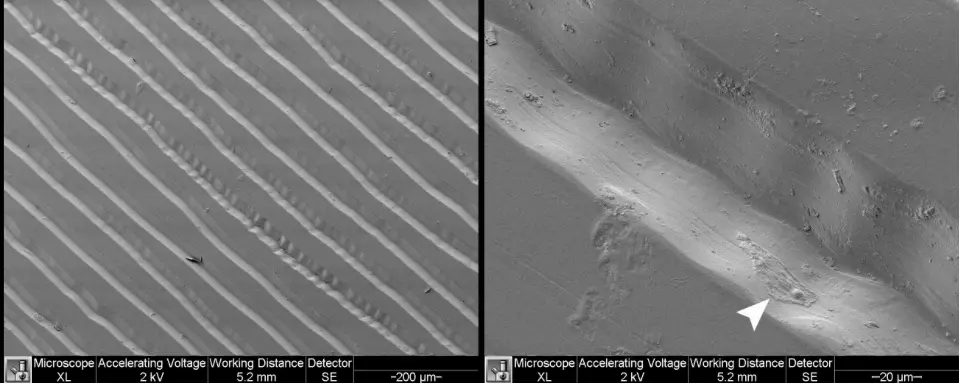
A vinyl record is a plastic disc containing a single continuous groove that produces sound when traced by the stylus of a turntable. Every sound wave in your music—every vocal note or drum hit—is represented by a tiny ripple within that groove.
Faithfully reproducing these complex sounds is an impressive physical feat. In the 1950s, engineers developed ingenious techniques to make this process more efficient, enabling the capture of the full range of audible sounds while optimizing a record's playtime—hence the name LP (long play). These methods, now industry standards, ensure the production of high-quality vinyl records.
Inside the Groove
The audible sound range extends from 20 Hz to 20,000 Hz (20 kHz). Vinyl, however, can reproduce frequencies from as low as 7 Hz to over 50 kHz, with a dynamic range exceeding 75 dB, ensuring a faithful representation of your music.
However, vinyl has physical limitations to consider. The first is available space: the surface area of a record is finite. Low frequencies and high volumes require more space, as their grooves must be wider and deeper. The more space the grooves take up, the shorter the record's playtime.
Another challenge is the stylus's ability to accurately follow the grooves. While low frequencies are relatively easy to follow due to their gentle curves, high frequencies—with their fast and tightly packed ripples—are more difficult to track. Adjustments are therefore necessary to ensure the stylus can navigate these complex grooves without skipping.
Essential Steps to Avoid Issues
Managing Low Frequencies
Vinyl can produce powerful bass, but extremely low frequencies (below 40 Hz) can cause the stylus to jump across adjacent grooves, leading to skips. To prevent this:
- Keep bass frequencies well-controlled and centered in the mix.
- Frequencies below 100 Hz should remain mono, as stereo bass requires significant vertical stylus movement, which can lead to skips.
Additionally, any phase misalignment (particularly below 300 Hz) can result in groove interruptions. Ensure that low frequencies are in phase to avoid these problems.
Controlling High Frequencies
High frequencies (above 20 kHz) can overheat the cutting head, causing noise and distortion. Instruments such as cymbals, tambourines, or hi-hats should be balanced in the mix.
- Use a de-esser to reduce vocal sibilance caused by sounds like “s” or “f.”
- Vocal sibilance, the percussive sound produced when singers emphasize certain letters like “s,” “f,” or “t,” can cause distortions if not properly managed. A de-esser can effectively suppress harsh sibilance in vocals while preserving other high frequencies. A de-esser works as a dynamic equalizer targeting the sibilance range (approximately 6–12 kHz).
- De-essing should be addressed during the mixing stage. If sibilance issues are not resolved before mastering, applying a de-esser to the entire mix may be the only option, which can negatively impact other elements of the song. While this approach can reduce sibilance, it may also unintentionally suppress desirable sounds within the affected frequency range.
- Though mastering engineers can remove sibilance after mixing, it's akin to performing surgery—possible, but it risks damaging nearby elements in the frequency spectrum. This last-resort solution can protect your album from harsh, grating sibilance but may result in a quieter record that's more prone to surface noise.
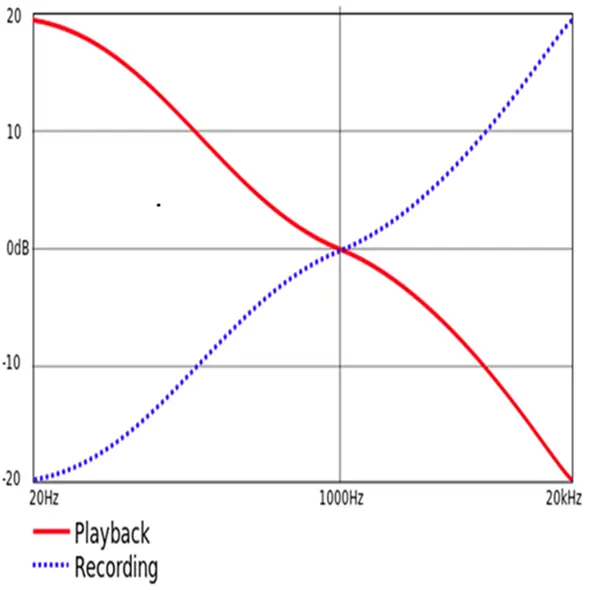
- Sibilance is particularly problematic on vinyl compared to digital formats due to the physical nature of the medium. This issue stems from a clever solution developed by engineers in the 1950s to optimize vinyl playback: the RIAA curve (Recording Industry Association of America). This standard equalization curve is applied before cutting the master to address space limitations caused by bass frequencies and to minimize surface noise on vinyl.
The Role of the RIAA Curve
To maximize record playtime and reduce surface noise, engineers in the 1950s introduced the RIAA curve, a standardized equalization method that:
- Reduces low frequencies and boosts high frequencies before cutting the vinyl. This not only reduces surface noise but also saves space on the record.
- During playback, a phono preamp applies the inverse of this curve to restore the natural sound balance..
- Here's how the RIAA curve works: starting at 1 kHz, low frequencies are attenuated by 6 dB per octave. At 20 Hz, extremely low frequencies are reduced by 20 dB. Conversely, the curve amplifies all frequencies above 1 kHz, increasing the level by up to 20 dB at 20 kHz. From top to bottom, this results in an overall 40 dB range difference.
- y reducing bass volume and boosting treble, the RIAA curve creates more space for music on the record while significantly lowering surface noise. You don't need to worry about this adjustment, as the RIAA curve is automatically applied to your music before the master is cut. This is also why a turntable requires a special phono preamp: it amplifies the small voltage produced by the turntable's cartridge while applying the inverse RIAA curve to restore the music's natural balance.
Volume Management
Avoid excessive limiting in your mix, as it may force the overall record volume to be lowered to prevent distortion.
As mentioned earlier, careful attention to volume is essential when preparing your album for vinyl. Avoid using brickwall limiters or finalizers in your mix. While limiting increases the average level of a digital track, it can ironically result in your vinyl album being cut at a lower volume to prevent excessive distortion.
Additionally, it's critical to leave enough dynamic headroom in your tracks before sending them for mastering. Keeping peak levels between -3 and -6 dB provides the mastering engineer with enough space to produce a clean, dynamic cut free of distortion. It's also important to remember that while the overall volume of your album can be adjusted during mastering, it's nearly impossible to isolate individual instruments or vocals in the mix. This limitation forces mastering engineers to adjust the volume of your entire track to address issues like overly weak bass or harsh sibilance. By creating a mix specifically tailored for vinyl and following these guidelines, you'll avoid having to compromise on volume to prevent distortion.
Groove Length and Structure
A vinyl record spins at a constant speed, but the length of a groove decreases as it approaches the center. For example, at 33 1/3 revolutions per minute, 2 seconds of music occupy 36 cm at the outer edge but only 14.9 cm near the label. This means the grooves near the center are more tightly packed, which can impact sound quality.
As audio data moves closer to the center of the record, the lateral oscillations of the grooves also become compressed, significantly affecting the stylus's ability to track the information. As a result, an album starts losing some high frequencies roughly halfway through one side of an LP.
A practical way to mitigate this loss in quality is to arrange the order of songs strategically. You can maximize sound quality by placing your most dynamic and impactful tracks at the beginning of the album. Conversely, a soft, quiet ballad will hold up much better in the critical inner-groove area near the label than a loud, intense dance track.
Consider the Duration of Each Side .
Another factor to consider is the duration of your album sides. The shorter a record side is, the more space is available for the grooves, allowing the mastering engineer to cut louder and more dynamic sounds without risking groove collisions. Conversely, the longer a record side is, the quieter it must be to leave sufficient space for each song.
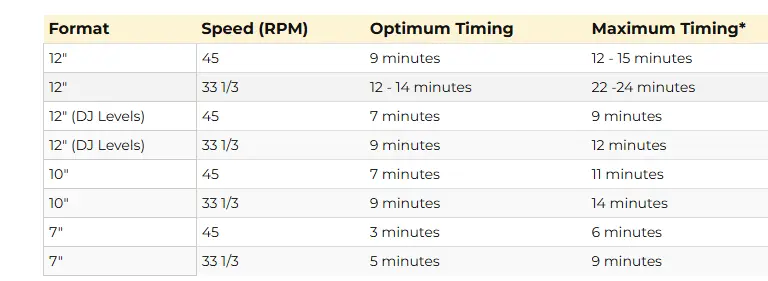
As if a lower overall volume weren't already a disadvantage, quieter records are also more susceptible to surface noise. In other words, with vinyl, shorter is better. As a general rule, vinyl record durations should adhere to the following limits:
- 33 1/3 RPM LPs: Aim for a maximum of 18–22 minutes per side for optimal quality.
- 45 RPM EPs or singles: Keep it under 12 minutes per side.
By adhering to these principles, you'll maximize both the sound quality and the durability of your vinyl records, ensuring an exceptional listening experience.
From Digital to Analog?
Some purists argue that pressing a vinyl record from a digital master goes against the very essence of vinyl and the analog listening experience it provides. However, several factors help dispel this concern. First, the physical interaction between the analog grooves of the record and the turntable stylus plays a significant role in producing the warm and authentic sound vinyl is known for. Second, the unique mixing and pre-mastering process required to create a vinyl-compatible master inherently alters the sound quality, whether it originates from a high-resolution WAV file or an analog tape recording.
When music is properly mixed and mastered by an experienced engineer, a vinyl record will almost always sound different from its digital counterpart. Today, with the high resolution offered by advanced sampling rates and increased bit depth, creating a vinyl master from a digital file is not only common but is also the standard practice for most vinyl production. Additionally, analog tape recording remains an expensive option, one that few musicians can afford and many studios no longer offer..
While the romantic notion of analog masters persists, as long as digital masters are at least 96 kHz/24-bit, the loss of sound quality on the final record is minimal. That said, bit depth – which determines the amount of information captured per sample – is more important than sampling frequency in kilohertz. For example, a 44 kHz/24-bit digital master will produce better sound than a 96 kHz/16-bit master. Ultimately, the final sound quality of a vinyl record depends far more on the skill of the mixing engineer, the expertise of the cutting technician, and the care taken by the manufacturer than on the master format itself.
Pay Attention to Logistical Details
Once your album has been properly mixed and pre-mastered, it's ready to be sent to the cutting studio for lacquer creation. At this stage, it's essential to include all necessary documentation with your mix to avoid unnecessary delays in the production timeline.
BLM Studio will require a complete tracklist, including song titles (don't forget hidden or bonus tracks), track durations, the total duration of each side, and the point where Side A ends and Side B begins. Double-check that this information matches the details printed on the record's label and sleeve. The pauses between songs in your mix should precisely reflect what you want on the final vinyl. These details enable BLM Studio's engineer to evaluate groove spacing, ensuring the best possible audio level and overall sound quality.
Finally, confirm that the vinyl pressing plant is prepared to receive your lacquers. A master lacquer is designed to be fragile, with a surface soft enough to be engraved by the cutting head. This also means it can begin to deteriorate within just a few days, even if kept in its protective packaging. For this reason, the cutting process should not begin until the pressing plant is ready to process your lacquers immediately upon receipt.


Conclusion
As you can see, releasing an album on vinyl requires careful consideration of many specific aspects. What works for a CD or a digital streaming platform doesn't necessarily apply to vinyl. This timeless medium comes with its own set of challenges and constraints that must be anticipated to fully reap its benefits. But the end result – an album with exceptional sound and beautifully crafted visuals in a large, tactile format – is well worth the effort.